
ORSUS Employee Guide
This guide is intended for employees who use ORSUS Self-service.
It provides an overview of how to use self-service capabilities and gives instructions for some of the basic functionality.
Registration
Employees need to register
themselves in the ORSUS application when they login to the application for the
first time.
Visit http://portal.issquaredinc.com/AuthenticationSettings/Login. The ORSUS Suite login page appears. | 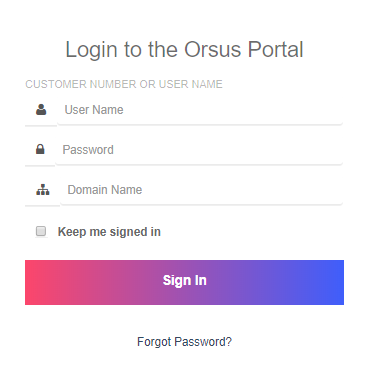 |
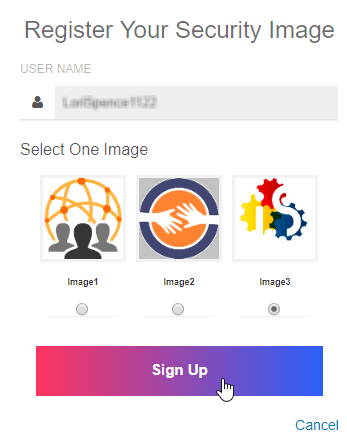
a)Enter login credentials that are provided by your manager, i.e., username and password and domain name in corresponding fields and then click Sign In. b) Select a question and enter an answer of your choice for all three questions and then click Save to register images that can be retrieved while resetting the password through Forgot Password option. c) Select the image that you want to set as security image (to be used when every time you sign to the portal) and then click Save. | 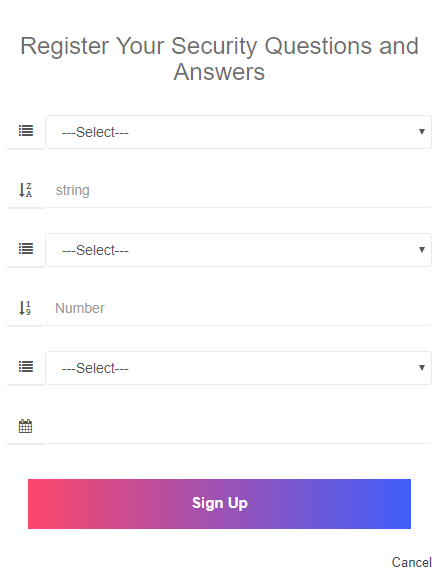 |
| a)Visit http://portal.issquaredinc.com/AuthenticationSettings/Login. b) Enter login credentials, i.e., username and password and domain name in corresponding fields and then click Sign In. c) Select the image that you have chosen as your security question and then click Verify. The ORSUS home page appears. |  |
Employee Login
After registration, employees login to the application with two factor authentication that includes username and password as well as Image based authentication.
a) Open the Portal Login Page b) Enter login credentials, i.e., username and password and domain name in corresponding fields and then click Sign In. c) Select the image that you have chosen as your security question and then click Verify. The ORSUS home page appears. Note: If you're logging using Windows Authentication (that uses your Active Directory credentials), you need to provide the information given above. You just enter your system username and password and enter login to access the portal. | 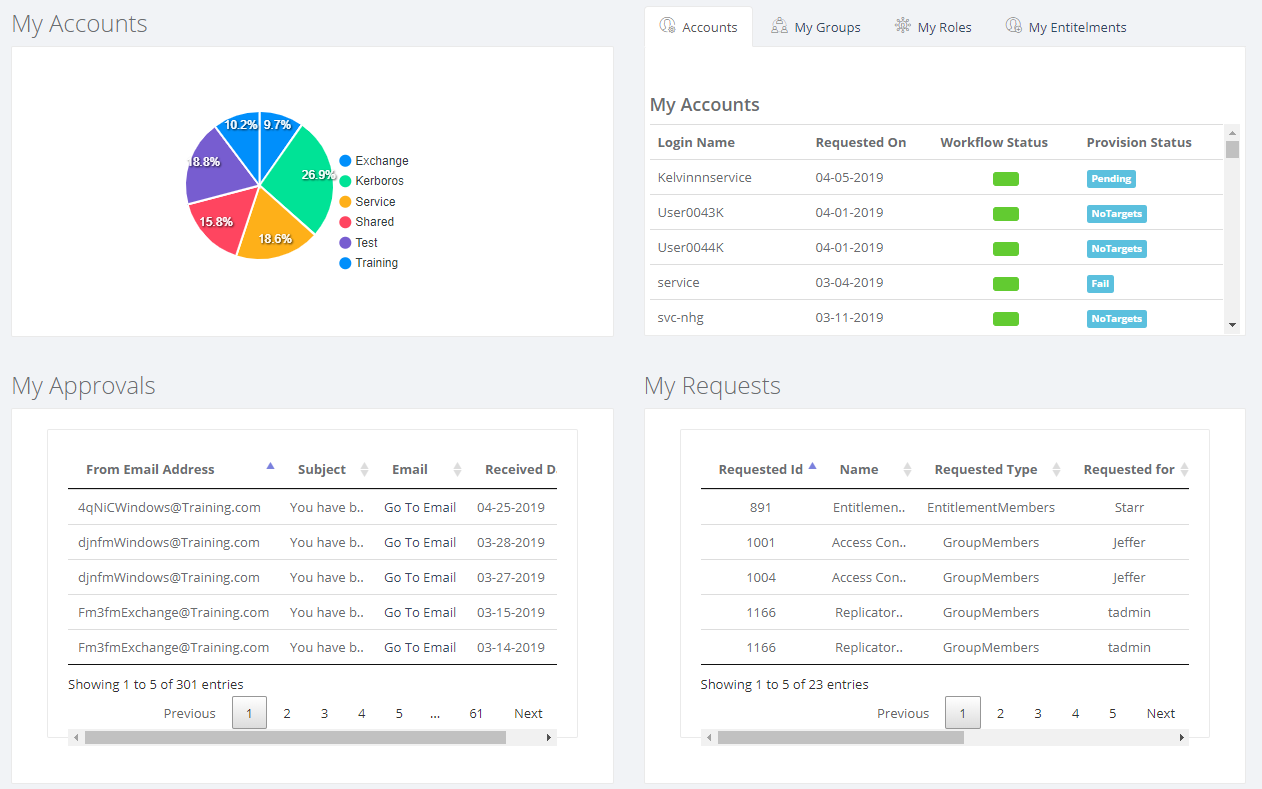 |
Inbox and Notification
Employees can view emails and notifications received that will include reminders, alerts and approvals.
a) On the top-right corner of the page, you will see a number appear next to Email and Notification icons. b) To access the Inbox, click on the Email icon and select the email. c) You will receive Notifications that keep you aware of key events occurred in the application | 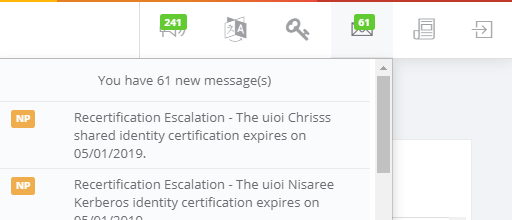 |
View Company Directory
Company Directory shows the list of all employees in your organization. You can search employees based on different criteria including employee’s name, title, location, skills, email addresses and other attributes.
To view company directory: a) On the Workforce menu, click the People tab and then click Company Directory on the sub-menu. The Employee Directory page displays. b) Search by any attribute of the employee. c) In the Advanced Search section, set the condition, type the name you're looking for and then click Preview. d) On the Employee record, click the arrow button to see more details of the employee you searched for. | 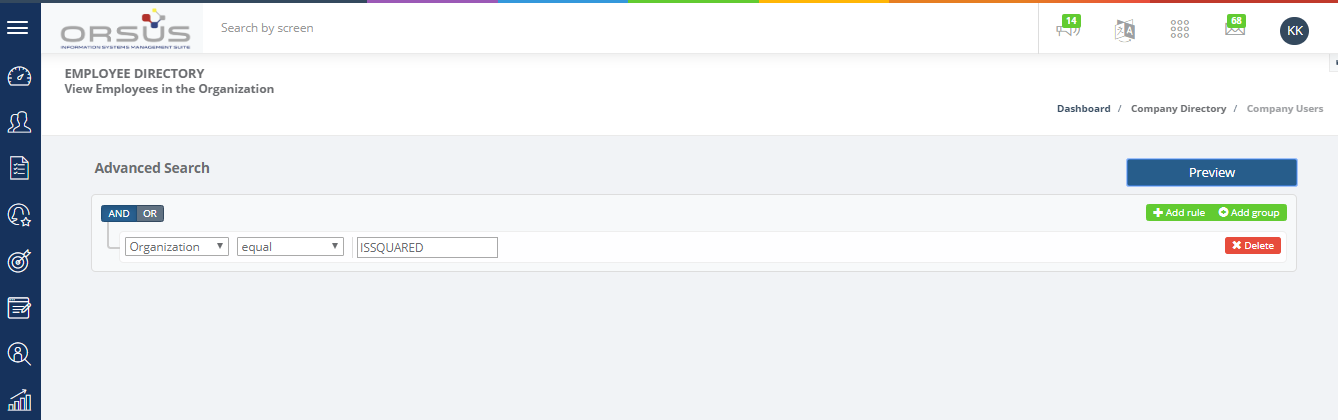  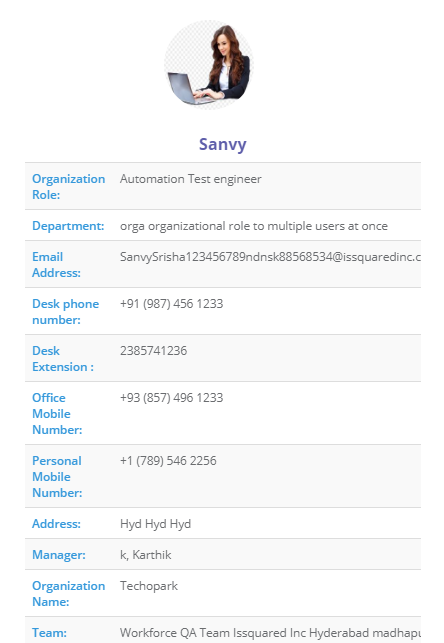 |
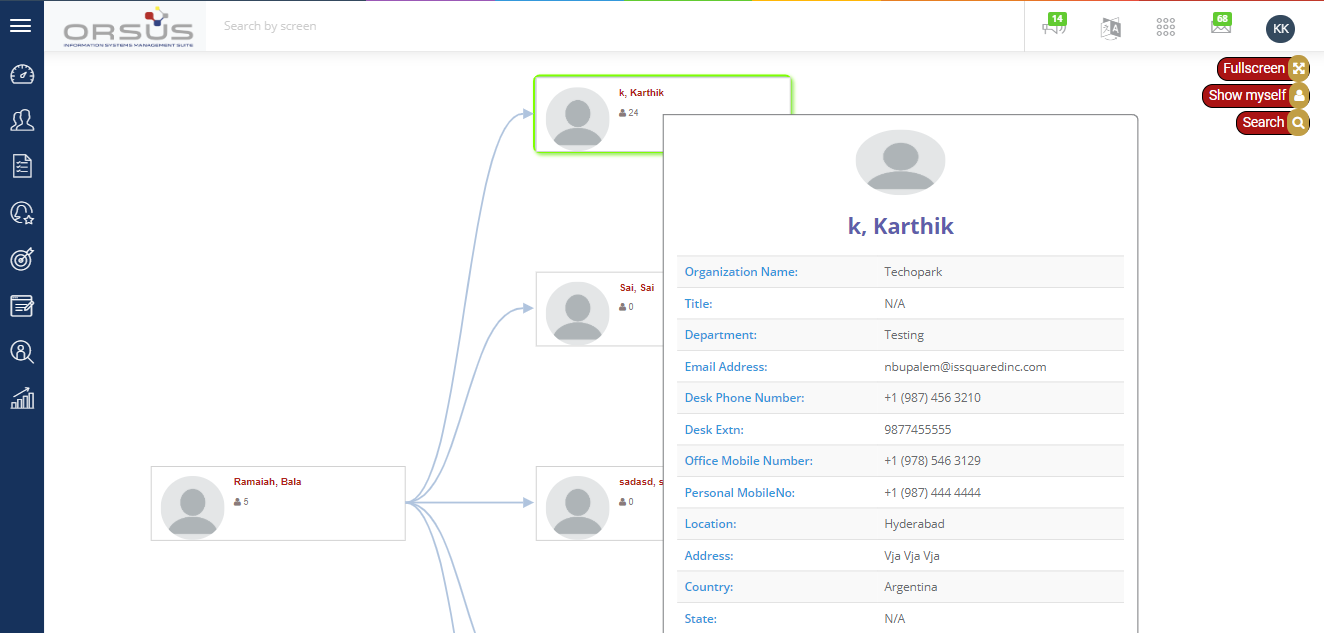
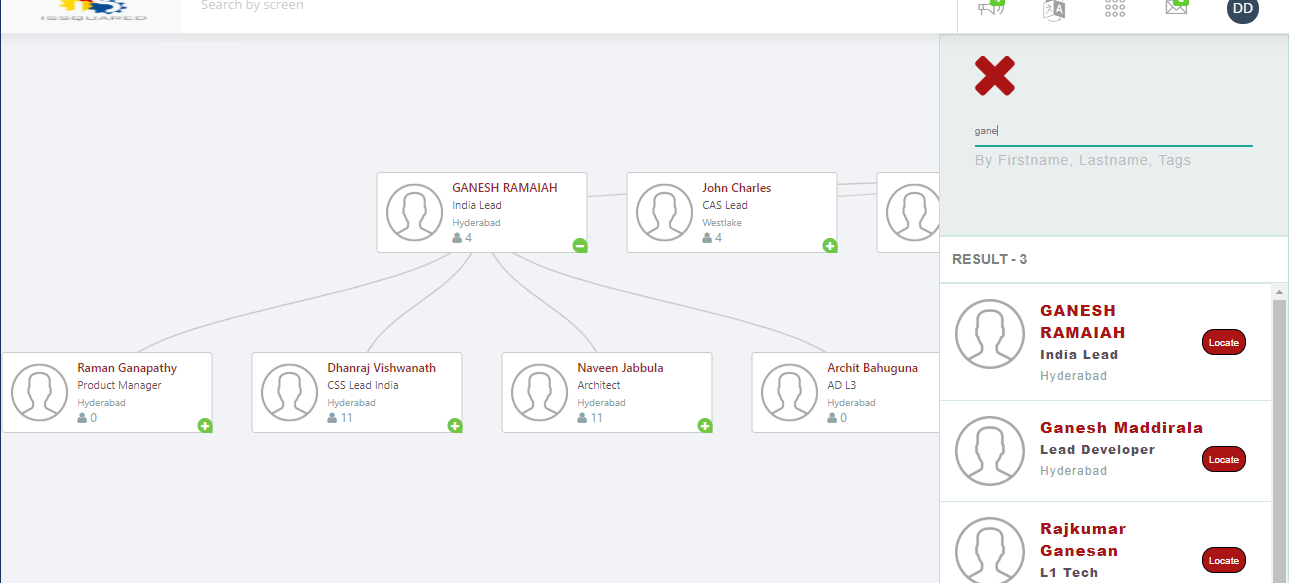
View Organization Chart
Organization chart defines hierarchal reporting structure that shows relationships among employees in a tree structure.
To view Org Chart: a) On the Workforce menu, click the People tab and then click Organization Chart on the sub-menu. The Organization Chart page displays. b) Click the Fullscreen button to view organizational chart in full-screen mode. c) Click the Show Myself button to view your hierarchal reporting structure and check your details. d) Click the Search button to view an employee hierarchal reporting structure with attributes like first name, last name and other related tags. |
 |
View and Manage Profile Information
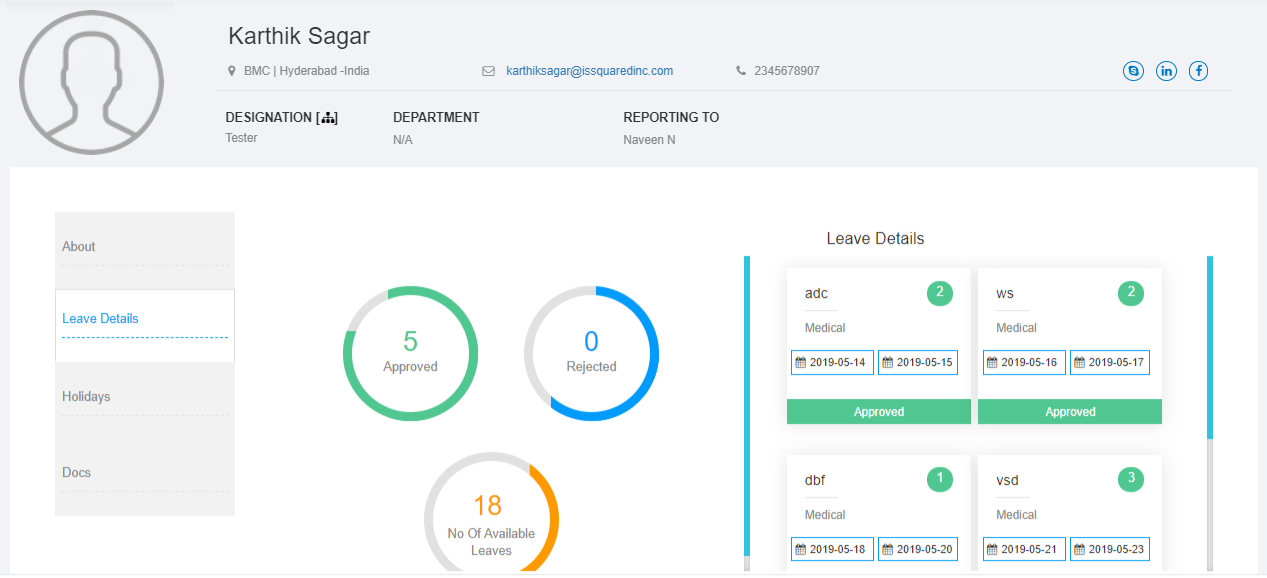
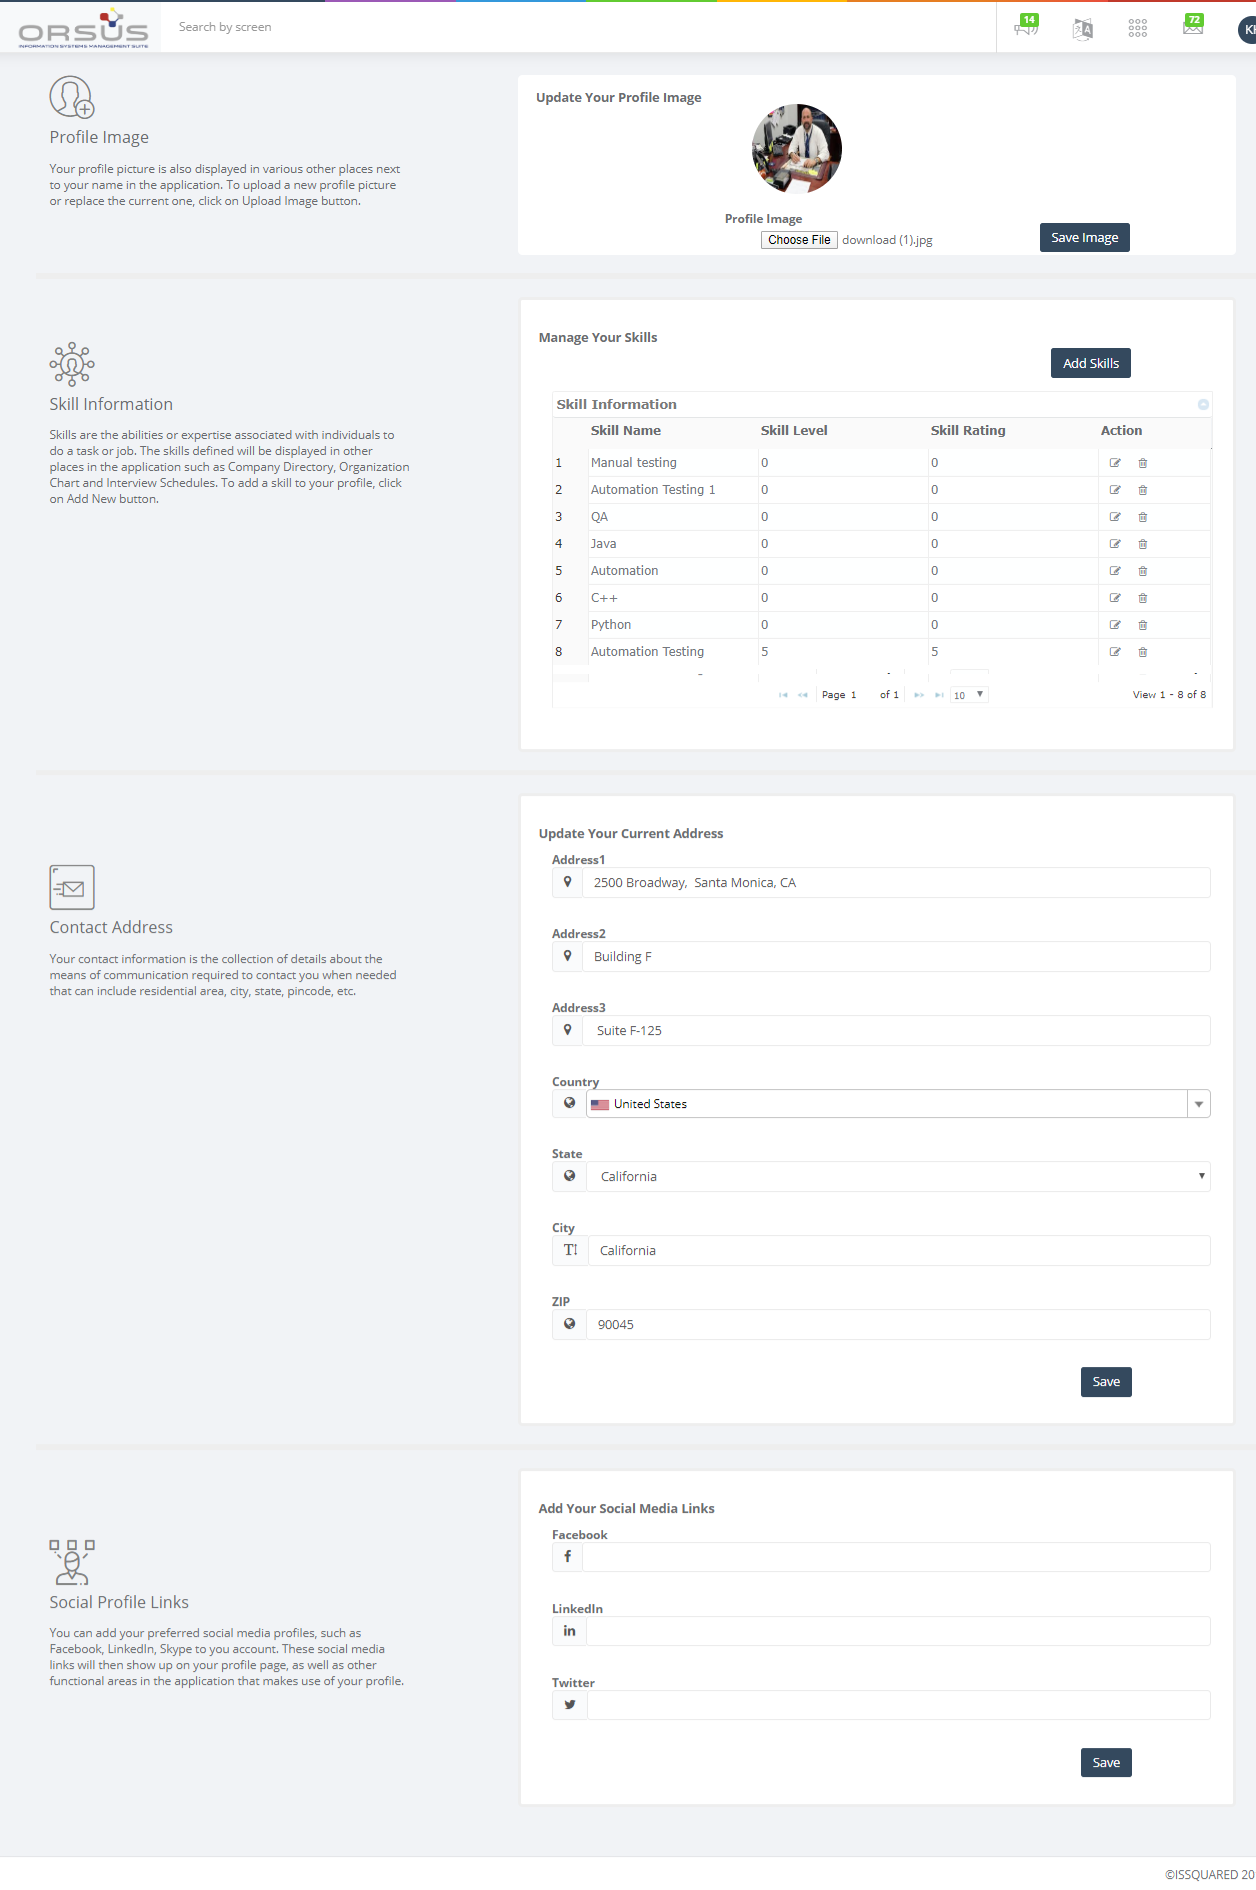
Employees can view their profile information that includes profile image, skill information, contact address, leave details, holidays and documents in the Profile page. And at the same time, they can update profile image, skill information, contact address and social profile links in the same page.
To view Profile Information: a) On the Workforce menu, click the Dashboard tab. On the Profile page, navigate to About, Leave Details, Holidays and Docs tabs to view the information. To Update Profile Information: a) On the Workforce menu, click the Dashboard tab. On the Profile page, hover the mouse on the profile image and then click button. b) To update profile image, click the button, upload new image and click Save. c) To update skills, Click button. Provide Skill Name, Skill Rating and Skill Level in the My Skills pop-up window and then click Save button. d) To update contact address, provide Address, Country, State and Zip fields in the Contact Address section. e) To update social media links, provide Facebook, LinkedIn, and Twitter fields in the Social Profile Links section |
  |
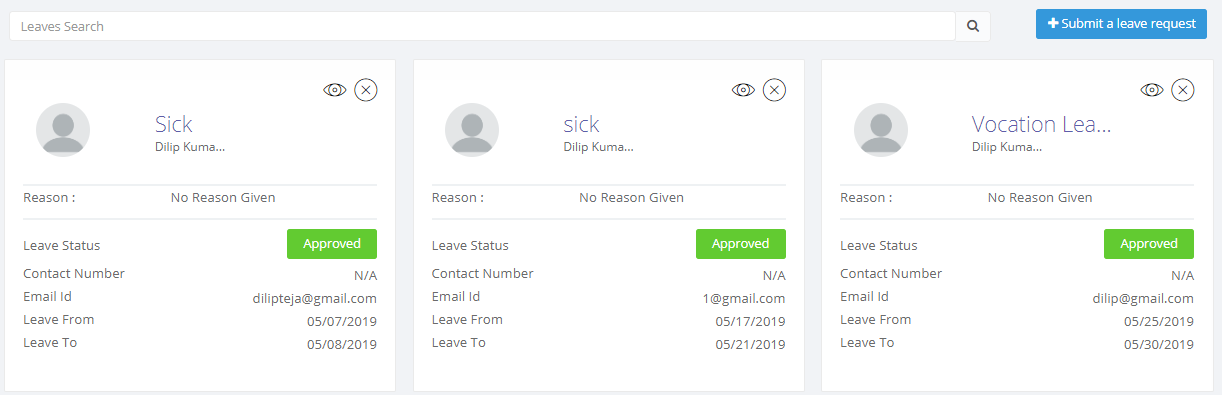
Manage Leave Requests
An employee (who assigned with a reporting manager) can raise/submit a leave request to his/her reporting manager. The application facilitates to draft the request for further modifications before submitting the request to manager. Employees can view their leave balances (while applying for a leave) according to the leave polices applicable to them.
Upon submitting, reporting supervisor receives the request and takes an action whether to proceed with approve or reject the request.
Once the request has been approved by the manager, the employee receives the approved status. The supervisor has authority to cancel approved request up to one day before actual leave date.
Once the request has been rejected by the manager, the employee receives the respective status. The application enables the employee with the facility to edit unapproved requests and resend for approval.
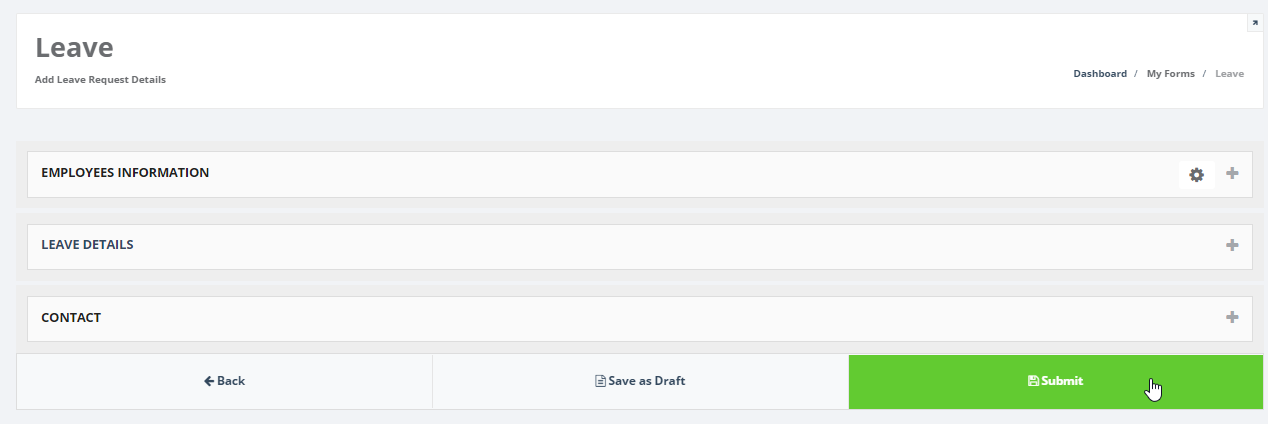
To apply for a leave: a) On the Workforce menu, click on My Forms and then click Leaves on the sub-menu. The Leave page displays. b) Click the New button to apply for a leave. c) Provide the required information, any comments or attachments if required and Submit the request. The request will now route to your Manager’s approval. |
  |
Manage Timesheet Requests
An employee (who assigned with a reporting supervisor) can fill the timesheet with time worked and submit it for reporting manager approval. The application facilitates to draft the timesheet for further modifications before submitting it to manager.
• Upon submitting, reporting manager receives the request and may approve or reject timesheet entry.
• If the timesheet request is approved by the manager, the employee receives the approved status.
• If the timesheet request is rejected, the employee receives the respective status and he/she can resubmit it after making changes to it.
• After submitting, employees can keep track of the status of timesheet entries such as approved and rejected. Employees can add, view, modify and delete an timesheet report, however, they cannot modify an timesheet report, after it submitted and approved.
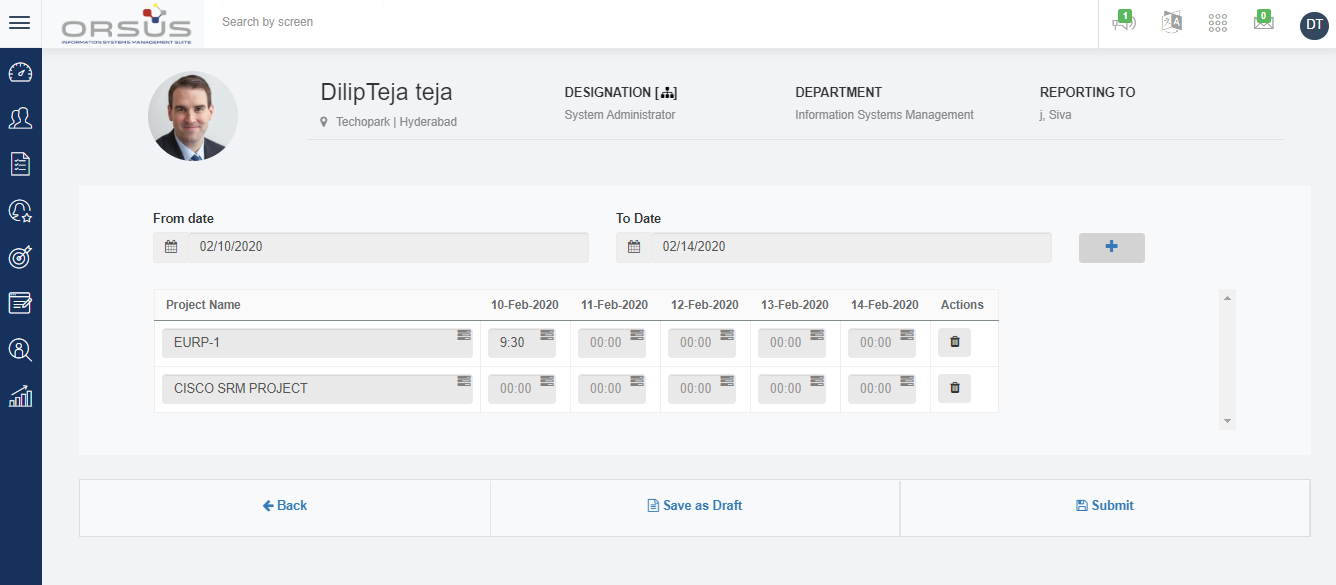
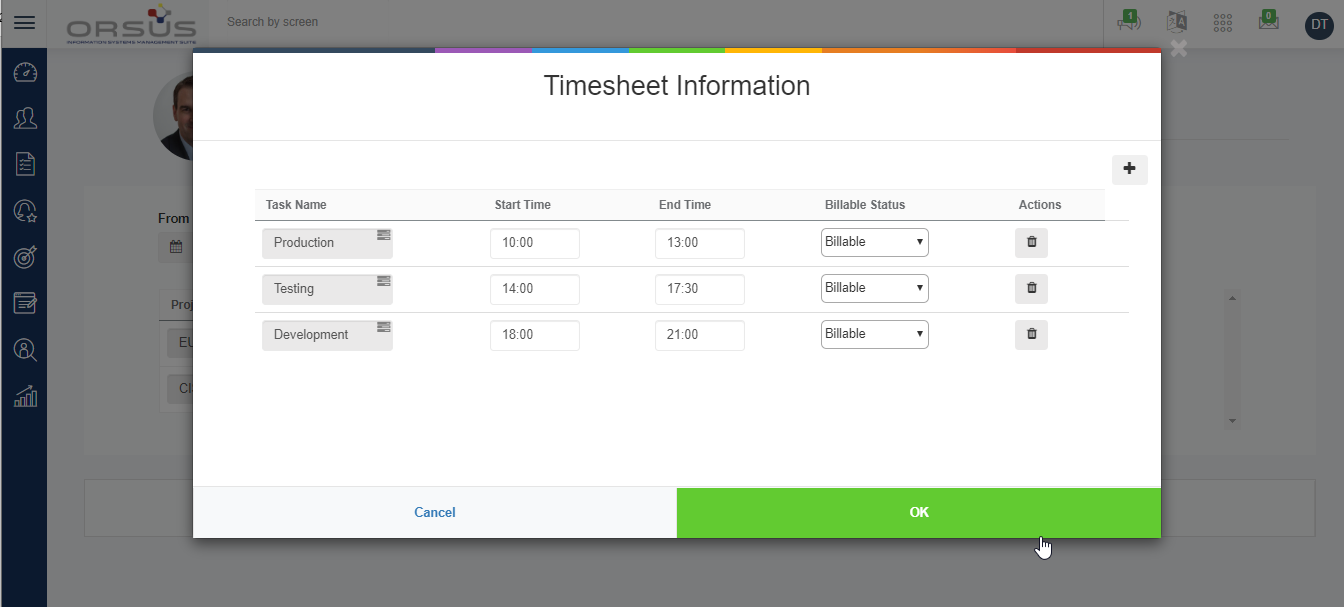
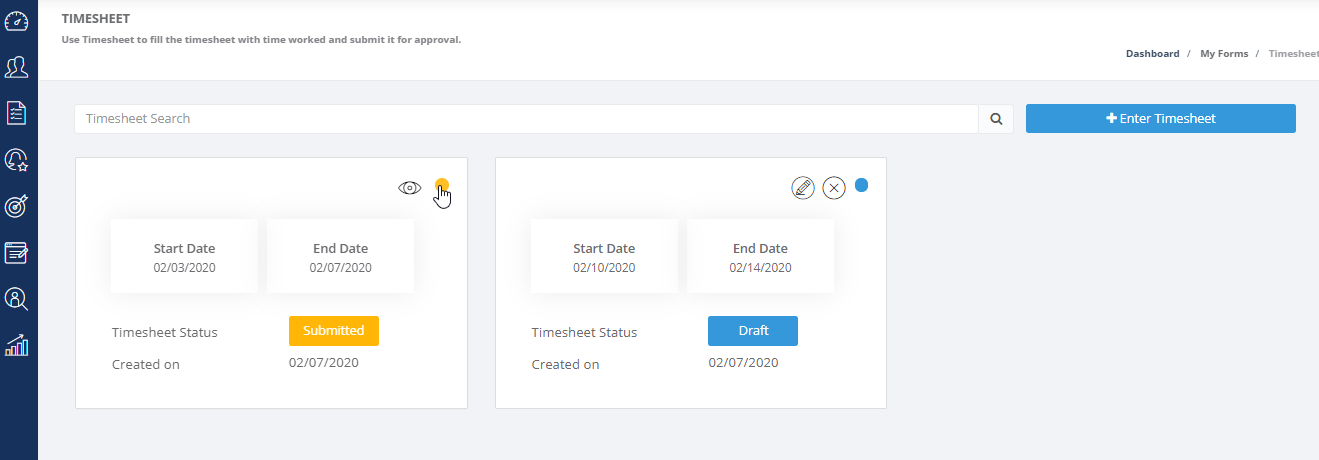
To create timesheet: a) On the Workforce menu, click on My Forms and then click Timesheet on the sub-menu. The Timesheet page displays. b) Click the New button. c) Select From Date and To Date, add project in the Project Name for the dates you've selected and then click Save as Draft. Note: Until save timesheet, you cannot add tasks for the project you've selected d) Click on icon to provide tasks information and duration spent tasks on a date you've worked for a project. e) Add tasks on the date you've worked for the project in the Timesheet Information pop-up window and then click Ok. e) After all tasks are added to projects you've added on the dates you've chosen, click Submit. The request will now route to your Manager’s approval. |
  |
|
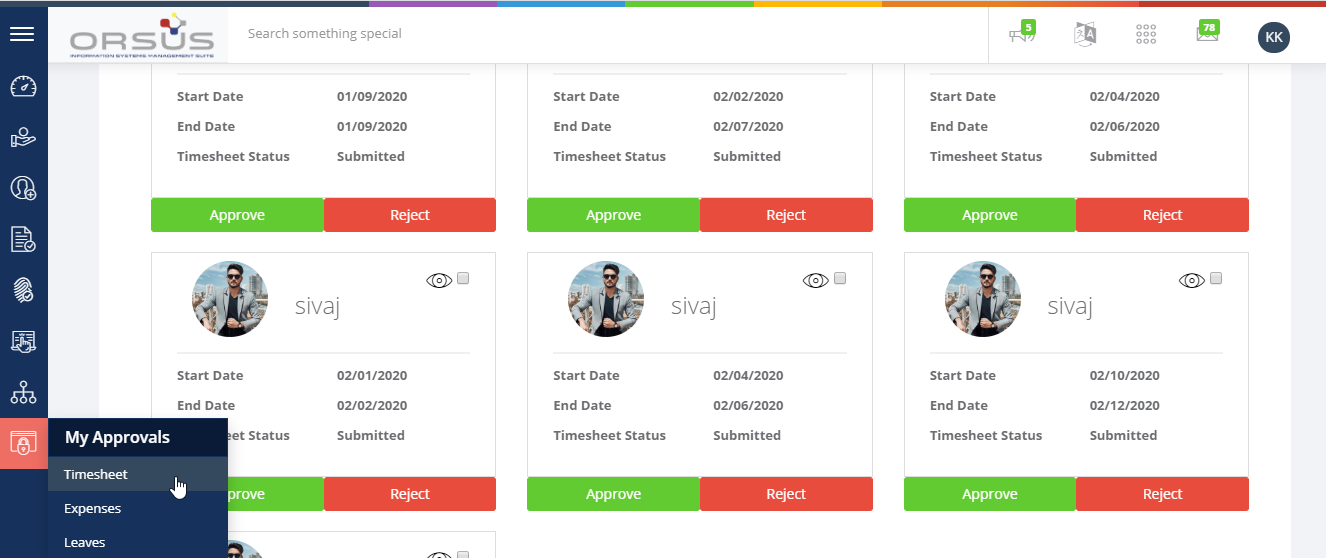
To Approve/Reject Timesheet requests: a) On the Global menu, click on My Approvals and then click Timesheet on the sub-menu. The Approvals for Timesheet Requests page displays. b) Click Approve/Reject button on the request that you would like to respond Note: You can view the Eye Icon on the request to view the details or the request. You can also respond to the request via email that you received as notification for the request submitted by an employee. |
 |
|
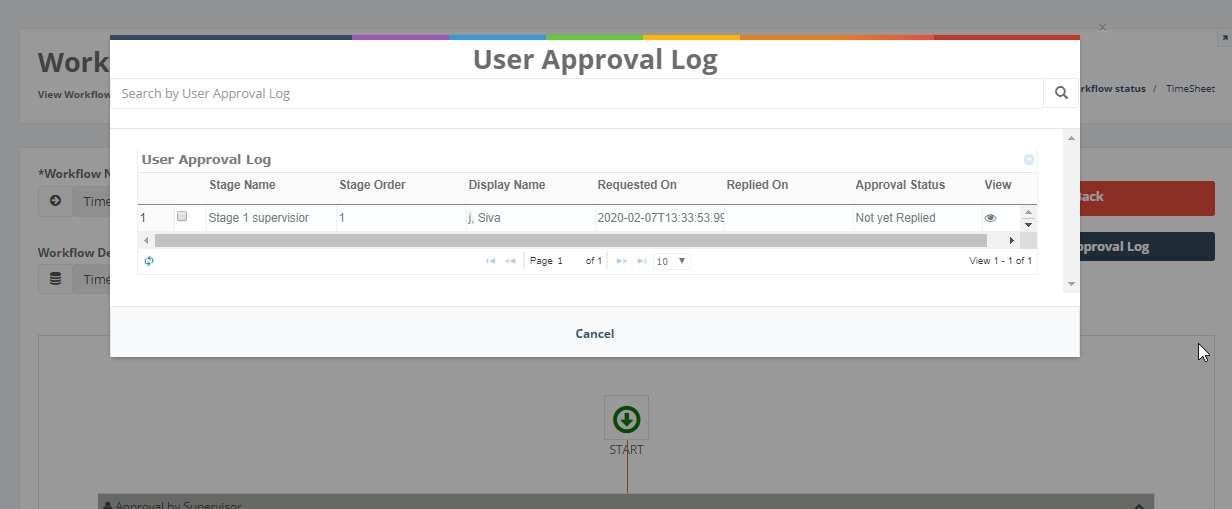
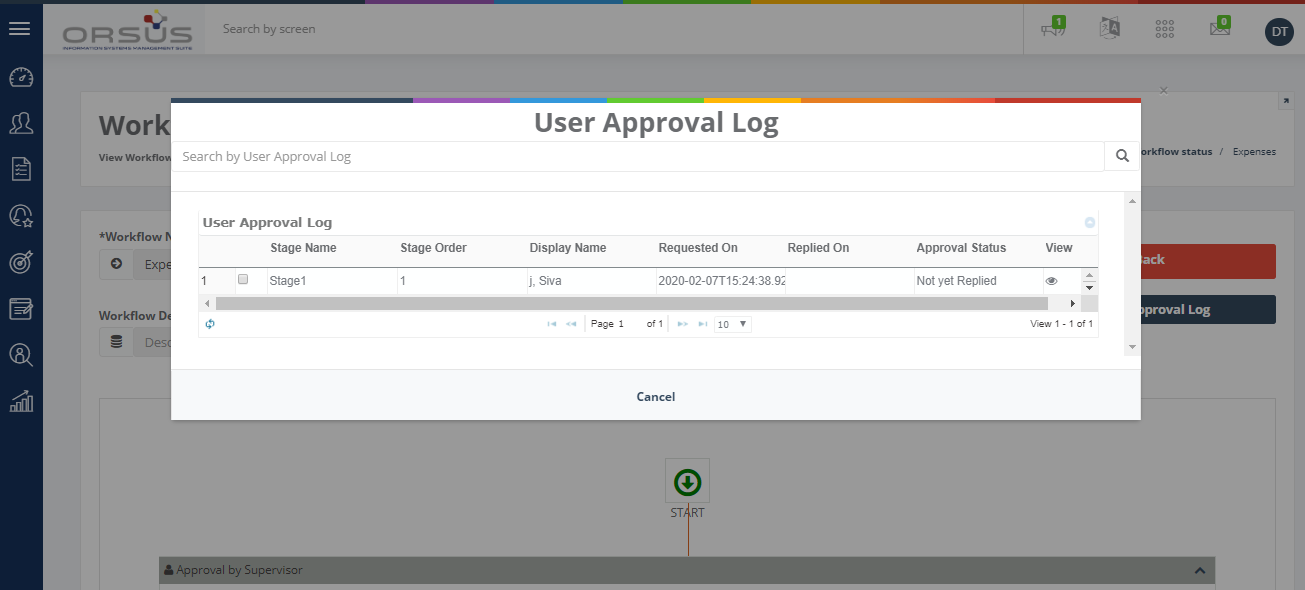
To track Timesheet request workflow status: a) On the Workforce menu, click on My Forms and then click Timesheet on the sub-menu. The Timesheet page displays b) Click the circle button on the top-right corner of the Timesheet record for which you would like to track the workflow status b) Click the User Approval Log button on the Workflow Status- Timesheet page to view more details of the workflow |
  |
Manage Reimbursement of Expenses
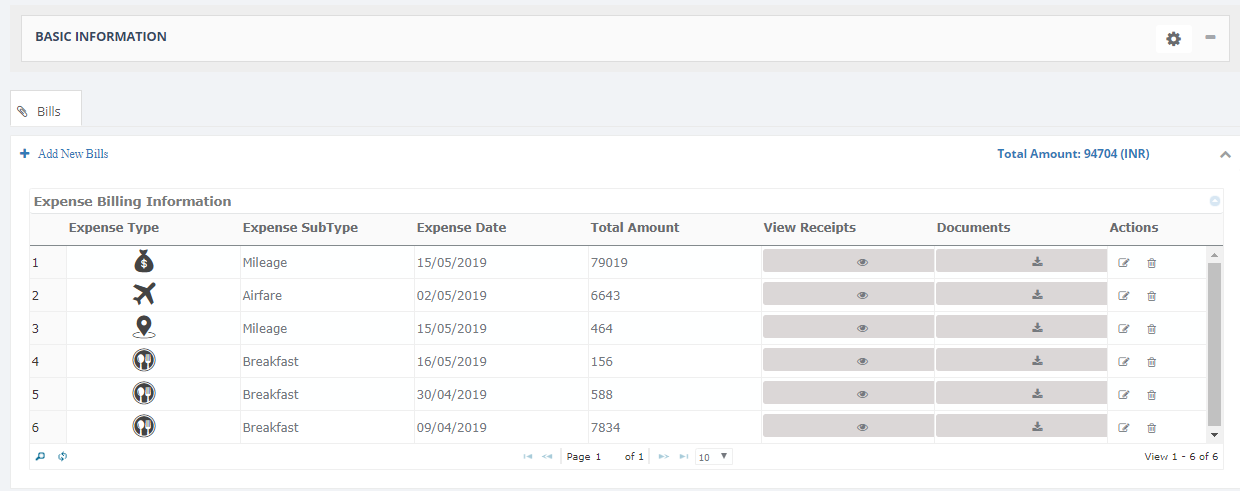
Employees can submit their expense entries to their Reporting Managers in terms of bills related to meals (food), travel-mileage, hotel accommodation, airfare, entertainment and other expenses. The application also facilitates to draft the report for further modifications before submitting to the manager.
• Upon submitting, reporting manager receives the request and may approve or reject expense entry.
• If the expense report is approved by the manager, the employee receives the approved status and expense amount will be reimbursed.
• If the expense report is rejected, the employee receives the respective status and expense report goes back to the employee.
• After submitting, employees can keep track of the status of expense entries such as approved and rejected. Employees can add, view, modify and delete an expense report, however, they cannot modify an expense report, after it submitted and approved.
• The application allows the employees to modify or update the expense report and submit again, when it is rejected.
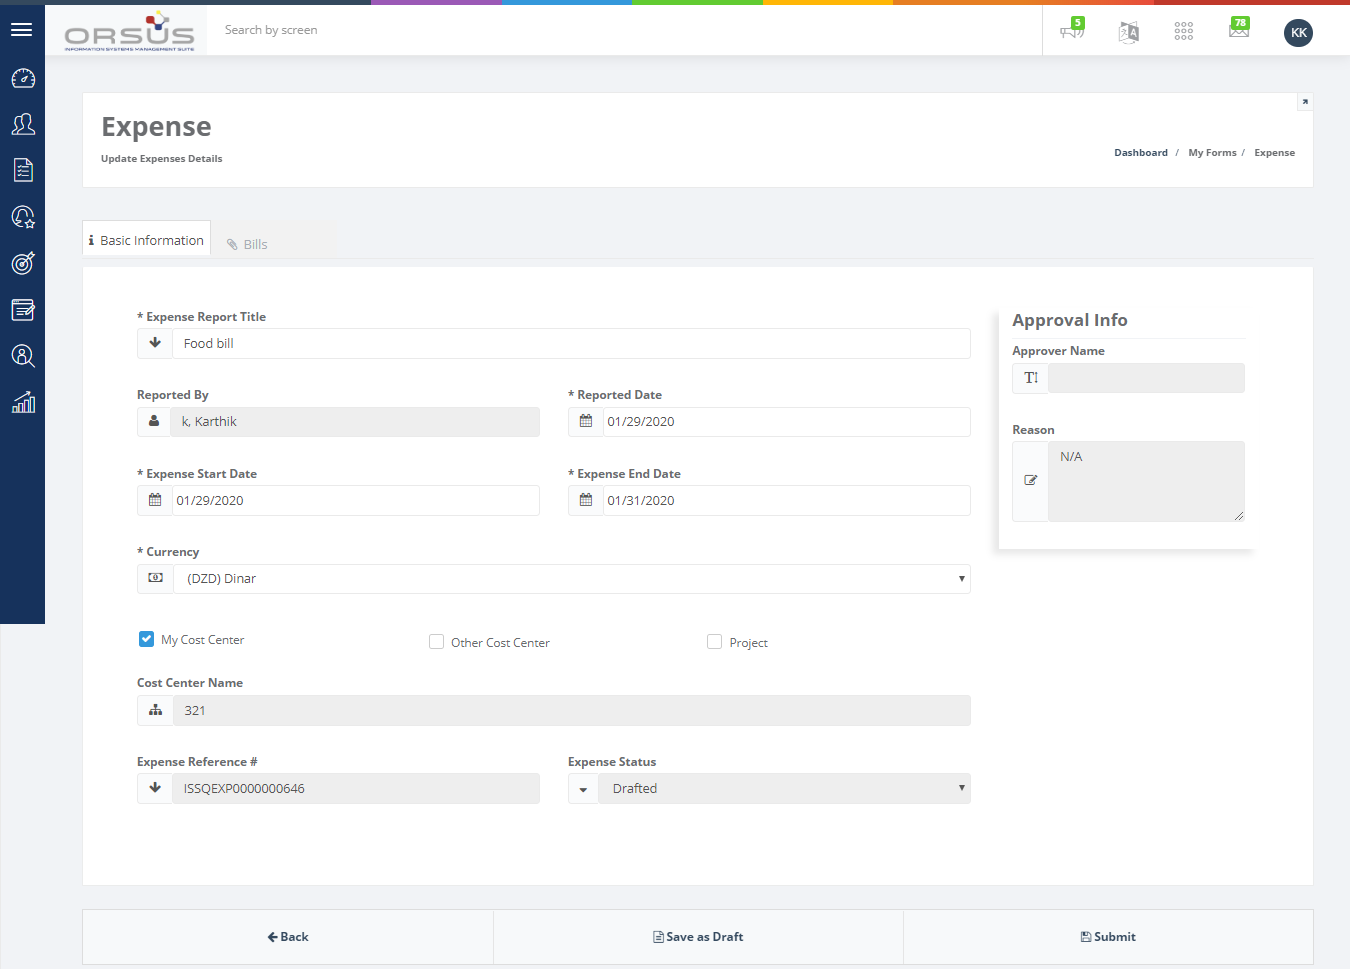
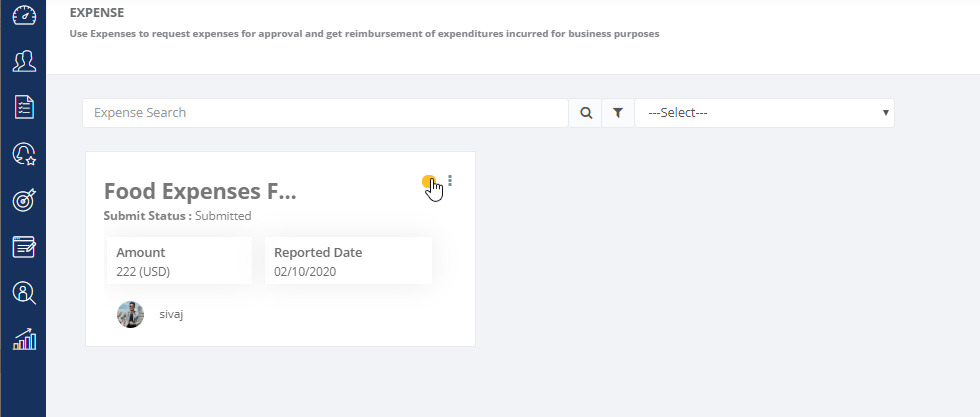
To apply for reimbursement of expenses: a) On the Workforce menu, click on My Forms and then click Expenses on the sub-menu. The Expense page displays. b) Click the New button. c) Provide the required information, bills and their attachments if required and Submit the request. The request will now route to your Manager’s approval. |
  |
|
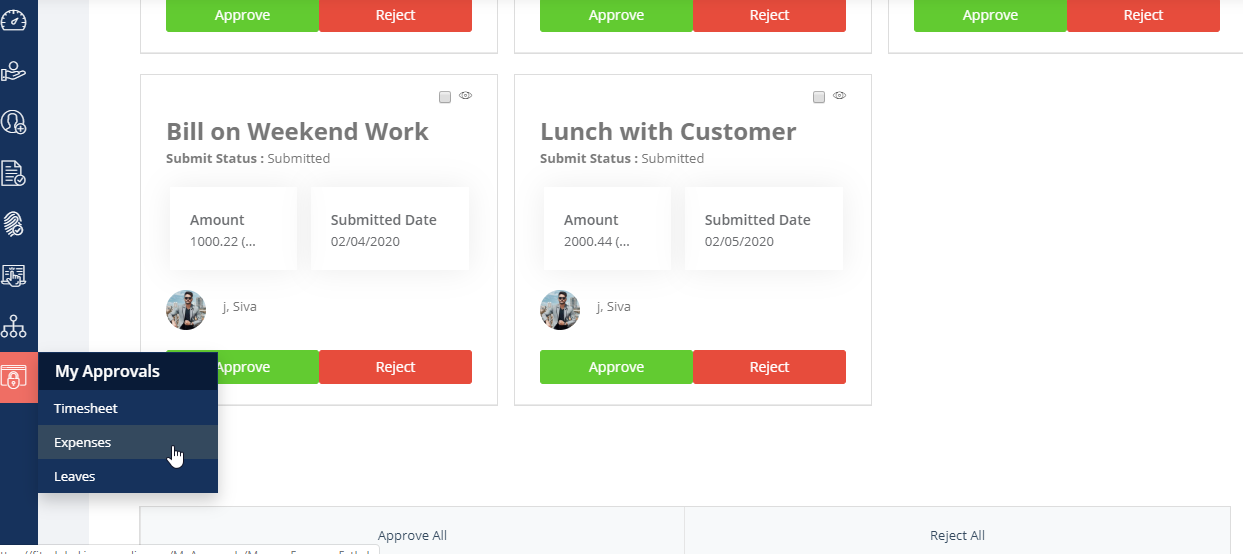
To Approve/Reject expense requests: a) On the Global menu, click on My Approvals and then click Expenses on the sub-menu. The Approvals for Expense Requests page displays. b) Click Approve/Reject button on the request that you would like to respond Note: You can view the Eye Icon on the request to view the details or the request. You can also respond to the request via email that you received as notification for the request submitted by an employee. |
 |
|
To track expense request workflow status: a) On the Workforce menu, click on My Forms and then click Expenses on the sub-menu. The Expense page displays b) Click the circle button on the top-right corner of the expense record for which you would like to track the workflow status b) Click the User Approval Log button on the Workflow Status- Expense page to view more details of the workflow |
  |
Manage Team Goals
The following is the process involved in managing the team goals.
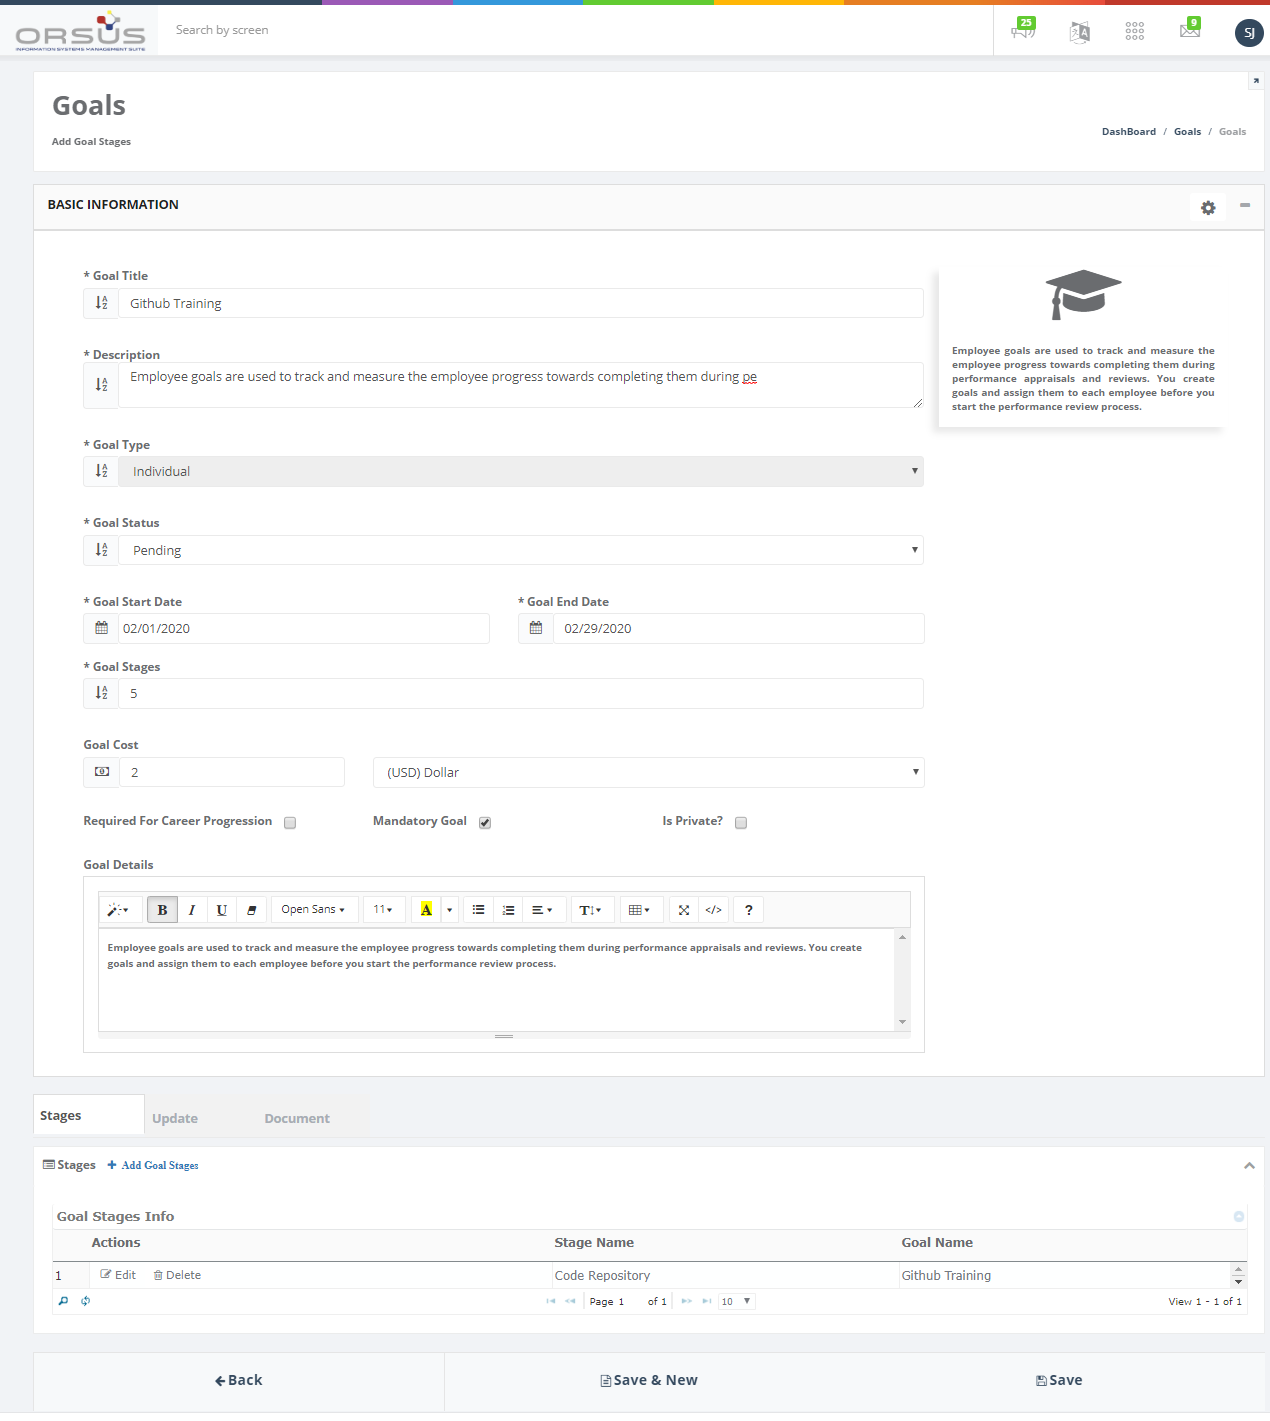
Step 1 – Set up Goals for Your Team – Managers can set up goals for your team members to see how their efforts are having impact on organization’s productivity and assess employee progress toward accomplishing them. They can create a goal with multiple stages, add multiple employees reporting to them, assign meeting dates and attach documents.
Goals can be mandatory or non-mandatory. Mandatory goals have to be achieved by employees so they cannot reject them but non-mandatory goals can be rejected if required.
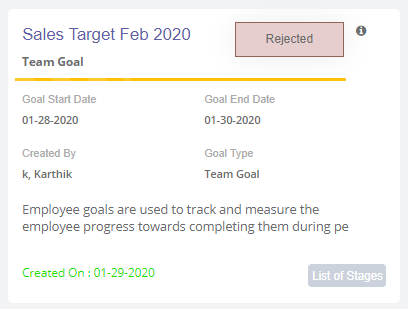
Step 2 – Accept Goal Requests - Employees receive goal requests, once a goal set for them by their managers. Then they can review the goal and choose to reject it if the goal is non-mandatory by providing a valid reason.
Step 3 – View Assigned Goals and Update Stages - Employees can view all agreed goals (both accepted and mandatory goals) and their information including stages involved, & documents shared, and meetings scheduled.
They can keep conversations going with manager on a stage included in the goal by providing notes and they can update each stage.
Step 4 – Track and Update Goal Progress - Managers can view and track the goal progress of a candidate by checking notes and status for each stage and then update the entire goal after all stages are completed or accomplished.
Note: Manager can view reason for rejection for non-mandatory goals set to the employees in the icon symbol.
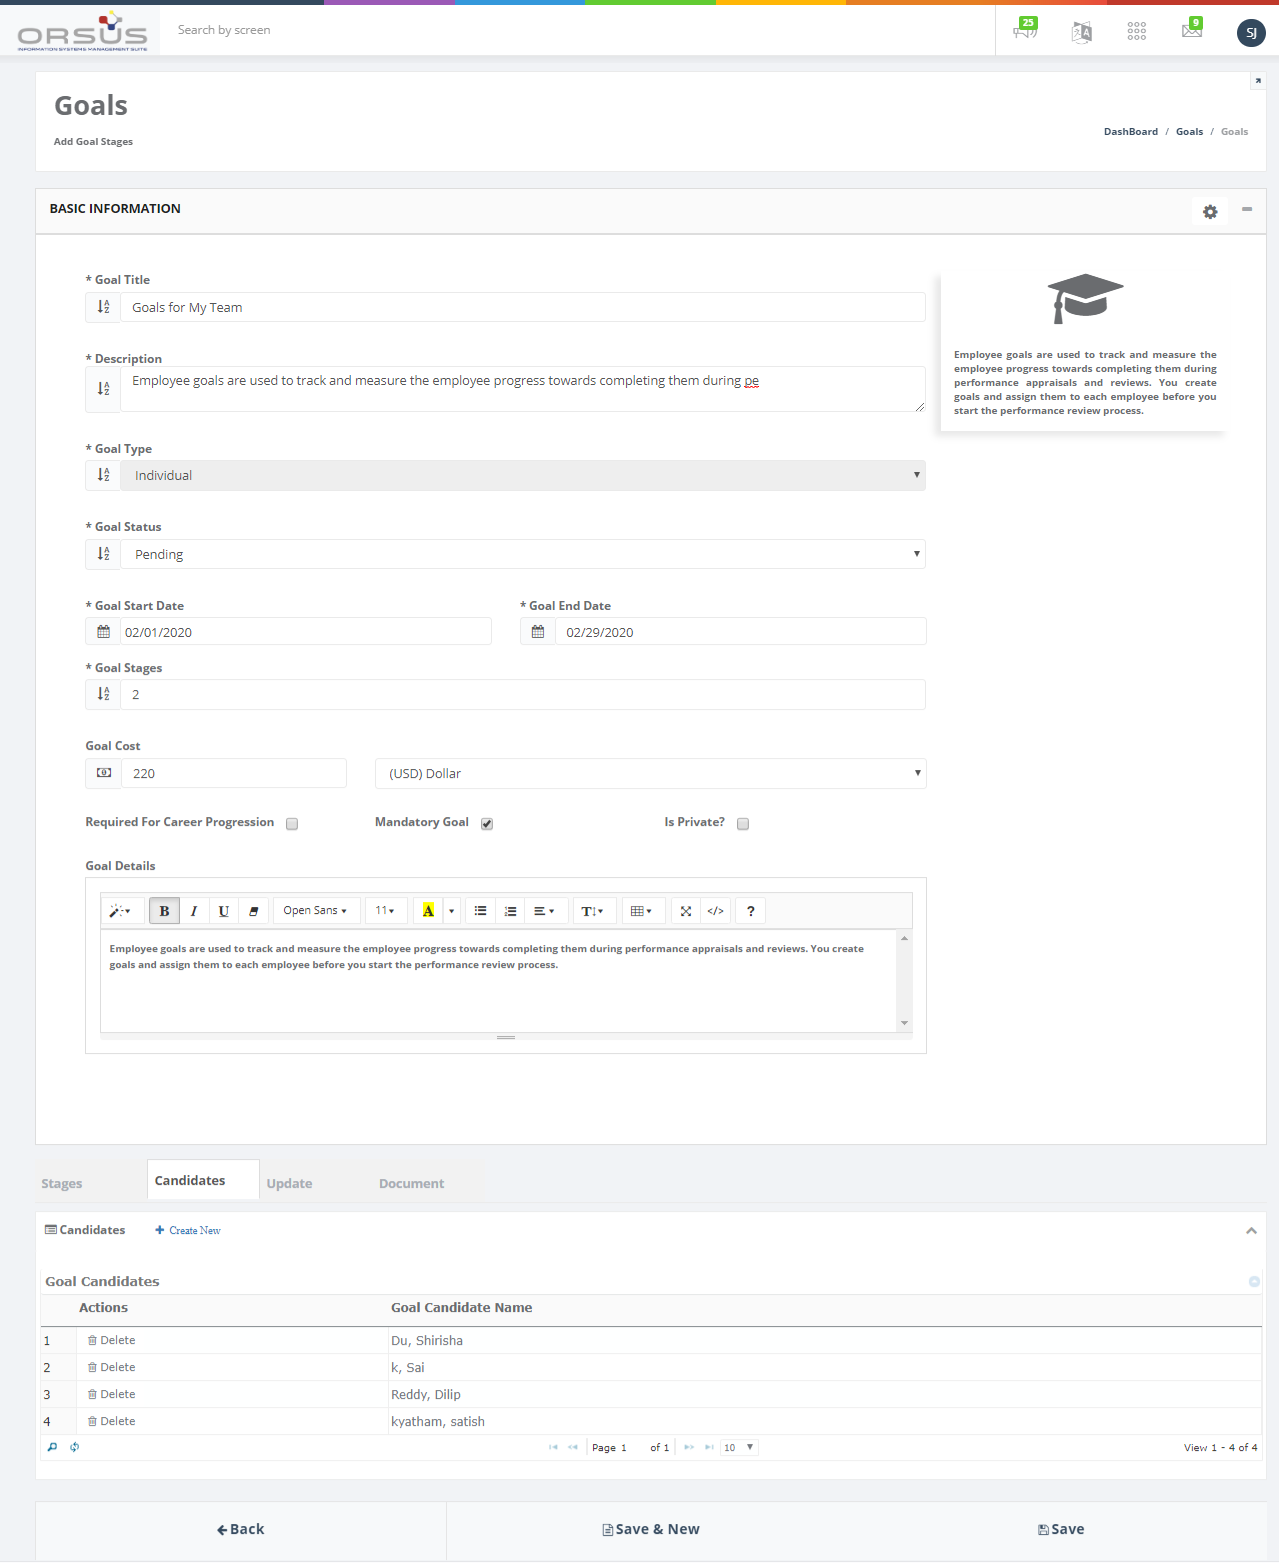
To create team goal: a) On the Workforce menu, click on Goals and then click My Goals on the sub-menu. The Goals page displays. b) On the Goal Setup tab, click the Create Team Goal button. c) Provide the required information in the Basic Information section and then click Save to view additional tabs. d) Add stages, Candidates, meeting schedules and documents in the additional tabs and then click Save. The candidates added will now get a record in the My Goals tab and Manager (who setup the goal) can view particular candidate goal in the My Team Goal tab |
 |
|
To respond to non-mandatory goals: a) On the Workforce menu, click on Goals and then click My Goals on the sub-menu. The Goals page displays. b) On the My Goals tab, click the Reject button, if you don't wish to accomplish the goal and provide a valid reason. |
 |
|
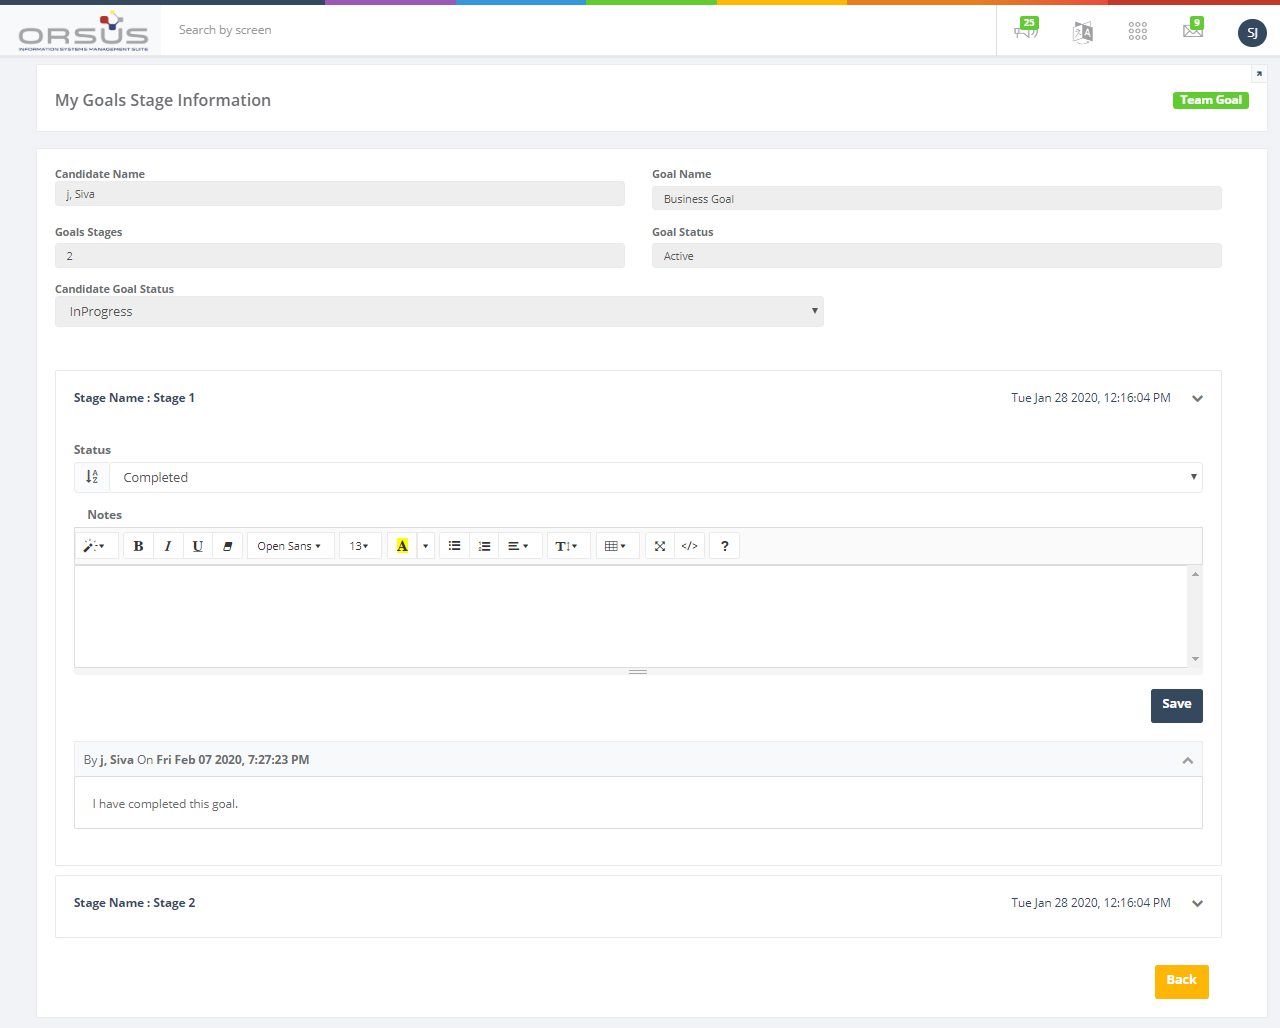
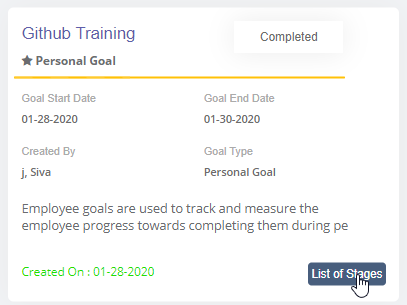
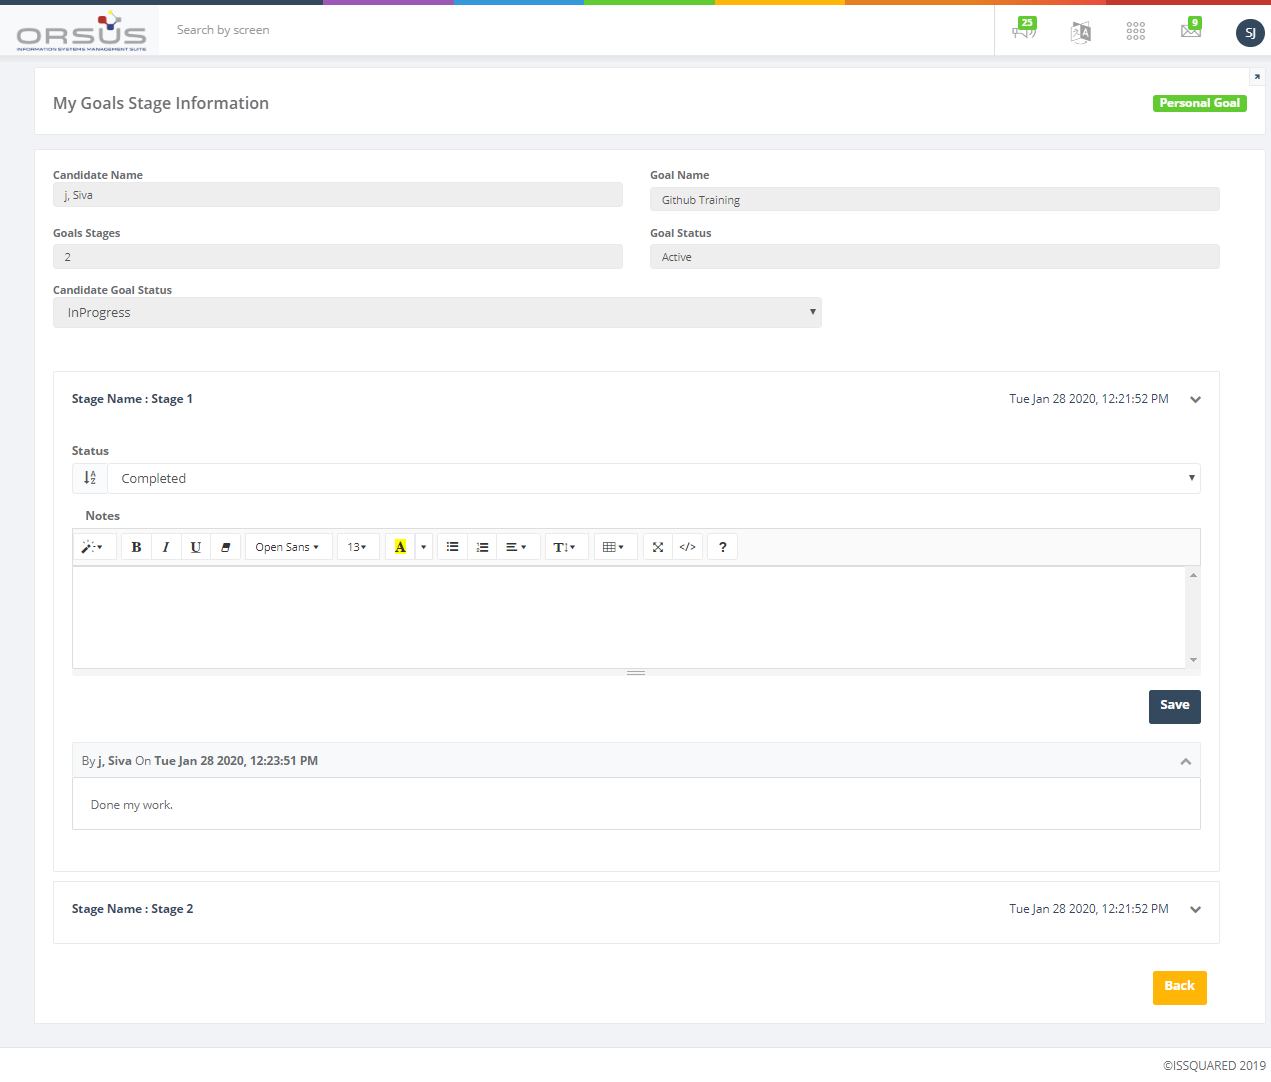
To view assigned goals and update their stages: a) On the Workforce menu, click on Goals and then click My Goals on the sub-menu. The Goals page displays. b) On the My Goals tab, view the assigned goals and click the List of Stages button to view stage information. c) Provide information in the Notes field for each stage, update the status and then click Save. |
 |
|
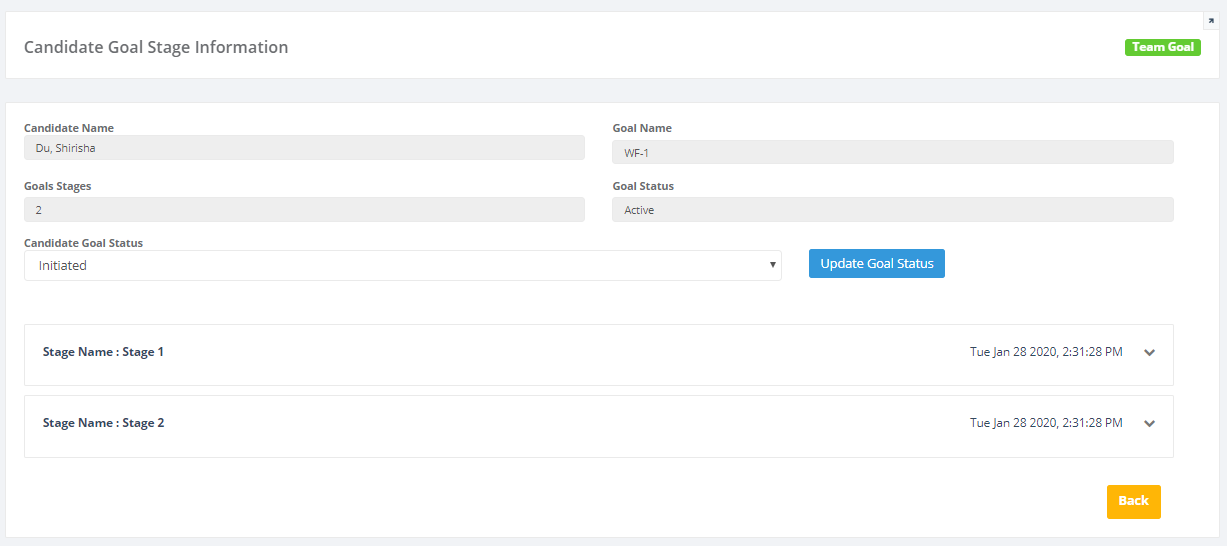
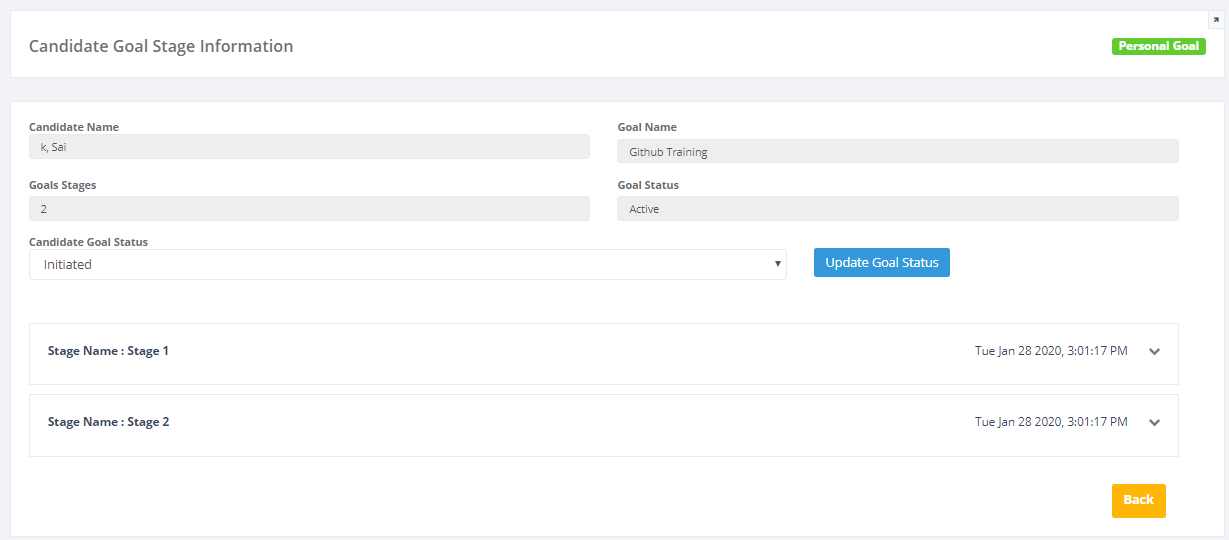
To view track an employee goal and update goal progress: a) On the Workforce menu, click on Goals and then click My Goals on the sub-menu. The Goals page displays. b) On the Team Goals tab, select the goal name and candidate name that you want to update and then click the List of Stages button c) Provide information in the Notes field for each stage and then click Save. d) Set the Candidate Goal Status and click Update Goal Status button to update the entire goal assigned to the candidate. |
 |
Manage Personal Goals
The following is the process involved in managing the personal goals.
Step 1 – Set up Goals for Yourself- All the employees (in the organization) can set up goals for themselves and choose to make them private or public. If they are private nobody will access those goals except you. So, you’ve to track and manage those goals.
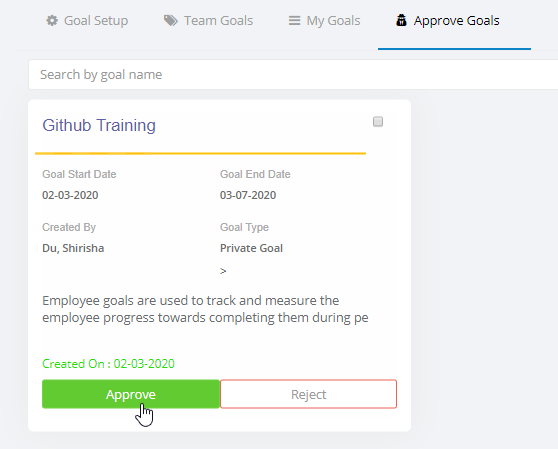
Step 2 – Get Approvals for Non-private Goals- Employee manager has to approve goals set up by an employee. Once manager receives email request, he/she will approve it.
Step 3 – Check Approval Status and Update Stages - Employees can view all approval status for personal goals.
They can keep conversations going with manager on a stage included in the goal by providing notes and they can update each stage.
Step 4 – Track and Update Goal Progress - Managers can view and track the goal progress of a candidate by checking notes and status for each stage and then update the entire goal after all stages are completed or accomplished.
To create personal goal: a) On the Workforce menu, click on Goals and then click My Goals on the sub-menu. The Goals page displays. b) On the Goal Setup tab, click the Create My Goal button. c) Provide the required information in the Basic Information section and then click Save to view additional tabs. d) Add stages, meeting schedules and documents in the additional tabs and then click Save. After creating personal goal, the same record will be available in the My Goals tab and Manager (who setup the goal) can view particular candidate goal in the My Team Goal tab |
 |
|
To Approve/Reject candidate individual goal requests: a) On the Workforce menu, click on Goals and then click My Goals on the sub-menu. The Goals page displays. b) On the Goal Approvals tab, click Approve/Reject button on the goal request that you would like to respond Note: You can view the Eye Icon on the request to view the details or the request. You can also respond to the request via email that you received as notification for the request submitted by an employee. |
 |
|
To check approval status and update their stages: a) On the Workforce menu, click on Goals and then click My Goals on the sub-menu. The Goals page displays. b) On the My Goals tab, check the approval status for the goal you've created and click the List of Stages button to view stage information. c) Provide information in the Notes field for each stage, update the status and then click Save. |
  |
|
To view track an employee goal and update goal progress: a) On the Workforce menu, click on Goals and then click My Goals on the sub-menu. The Goals page displays. b) On the Team Goals tab, select the goal name and candidate name that you want to update and then click the List of Stages button c) Provide information in the Notes field for each stage and then click Save. d) Set the Candidate Goal Status and click Update Goal Status button to update the entire goal assigned to the candidate. |
 |
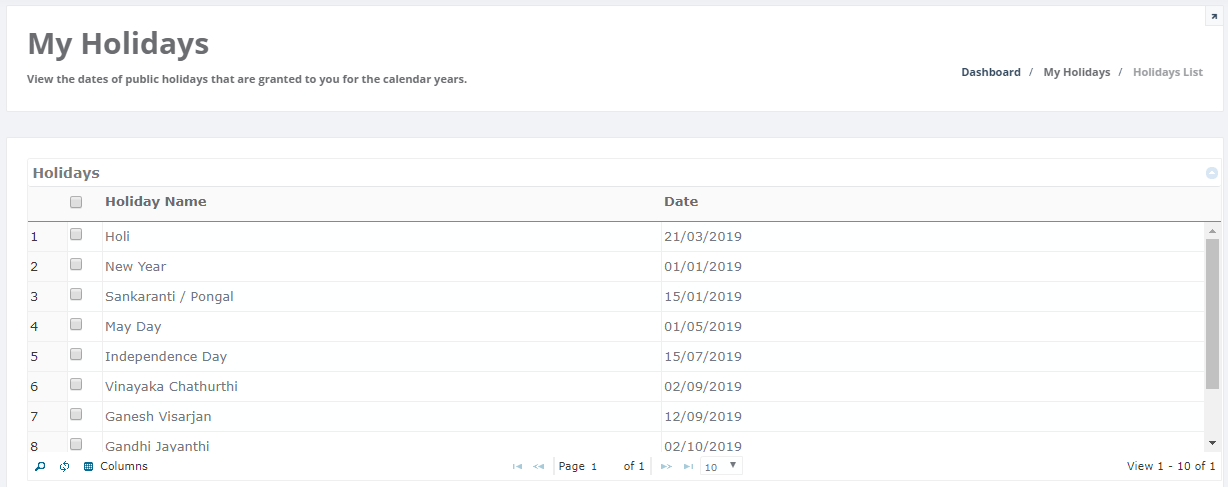
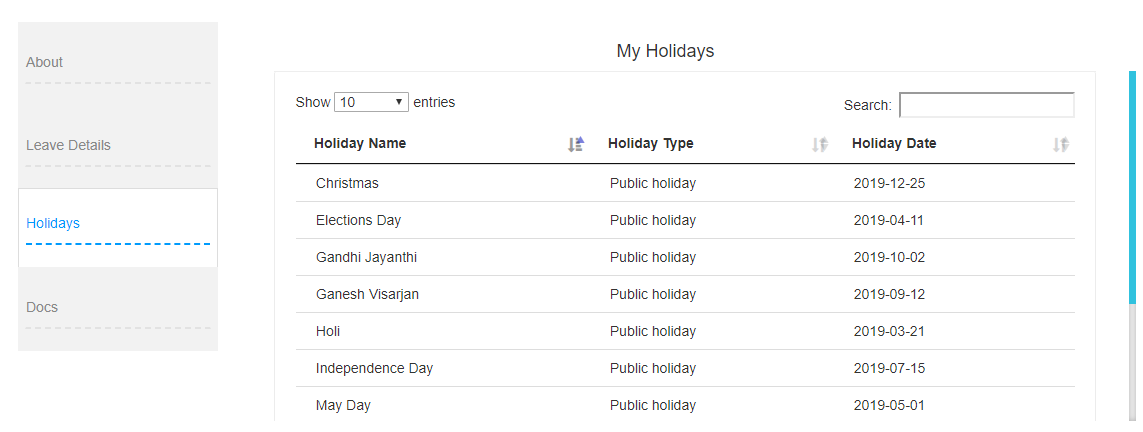
View Holidays List
Employees can view the dates of public holidays that are granted to you for the calendar years.
On the Workforce menu, click the People tab and then click My Holidays on the sub-menu. The My Holidays page displays. Or b) Click the New button. On the Workforce menu, click the Dashboard tab. On the Profile page, click Holidays tab. |
  |
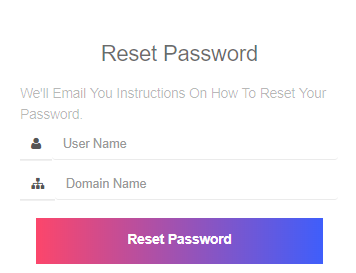
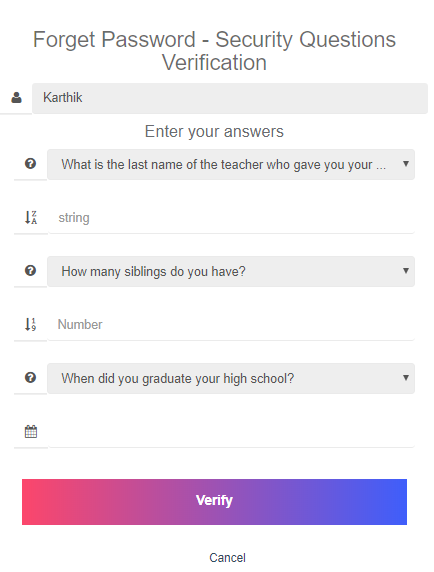
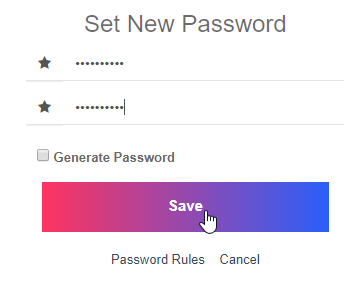
Forgot Password
Employees can reset their password when they ingnorant of old password. While resetting their password, they need to provide answers for the security questions challenged.
a) Open the portal Login page. b) Click Forgot Password on the login page. The Reset Password page appears. d) Provide answers to the challenge questions that you previously chose to be your security questions and then click Verify. e) Select the image that you want to set as security image (to be used when every time you sign to the portal) and then click Save. The Change Password page appears. f) Enter a new password, confirm it and then click Save to complete the Forgot Password process. |
    |
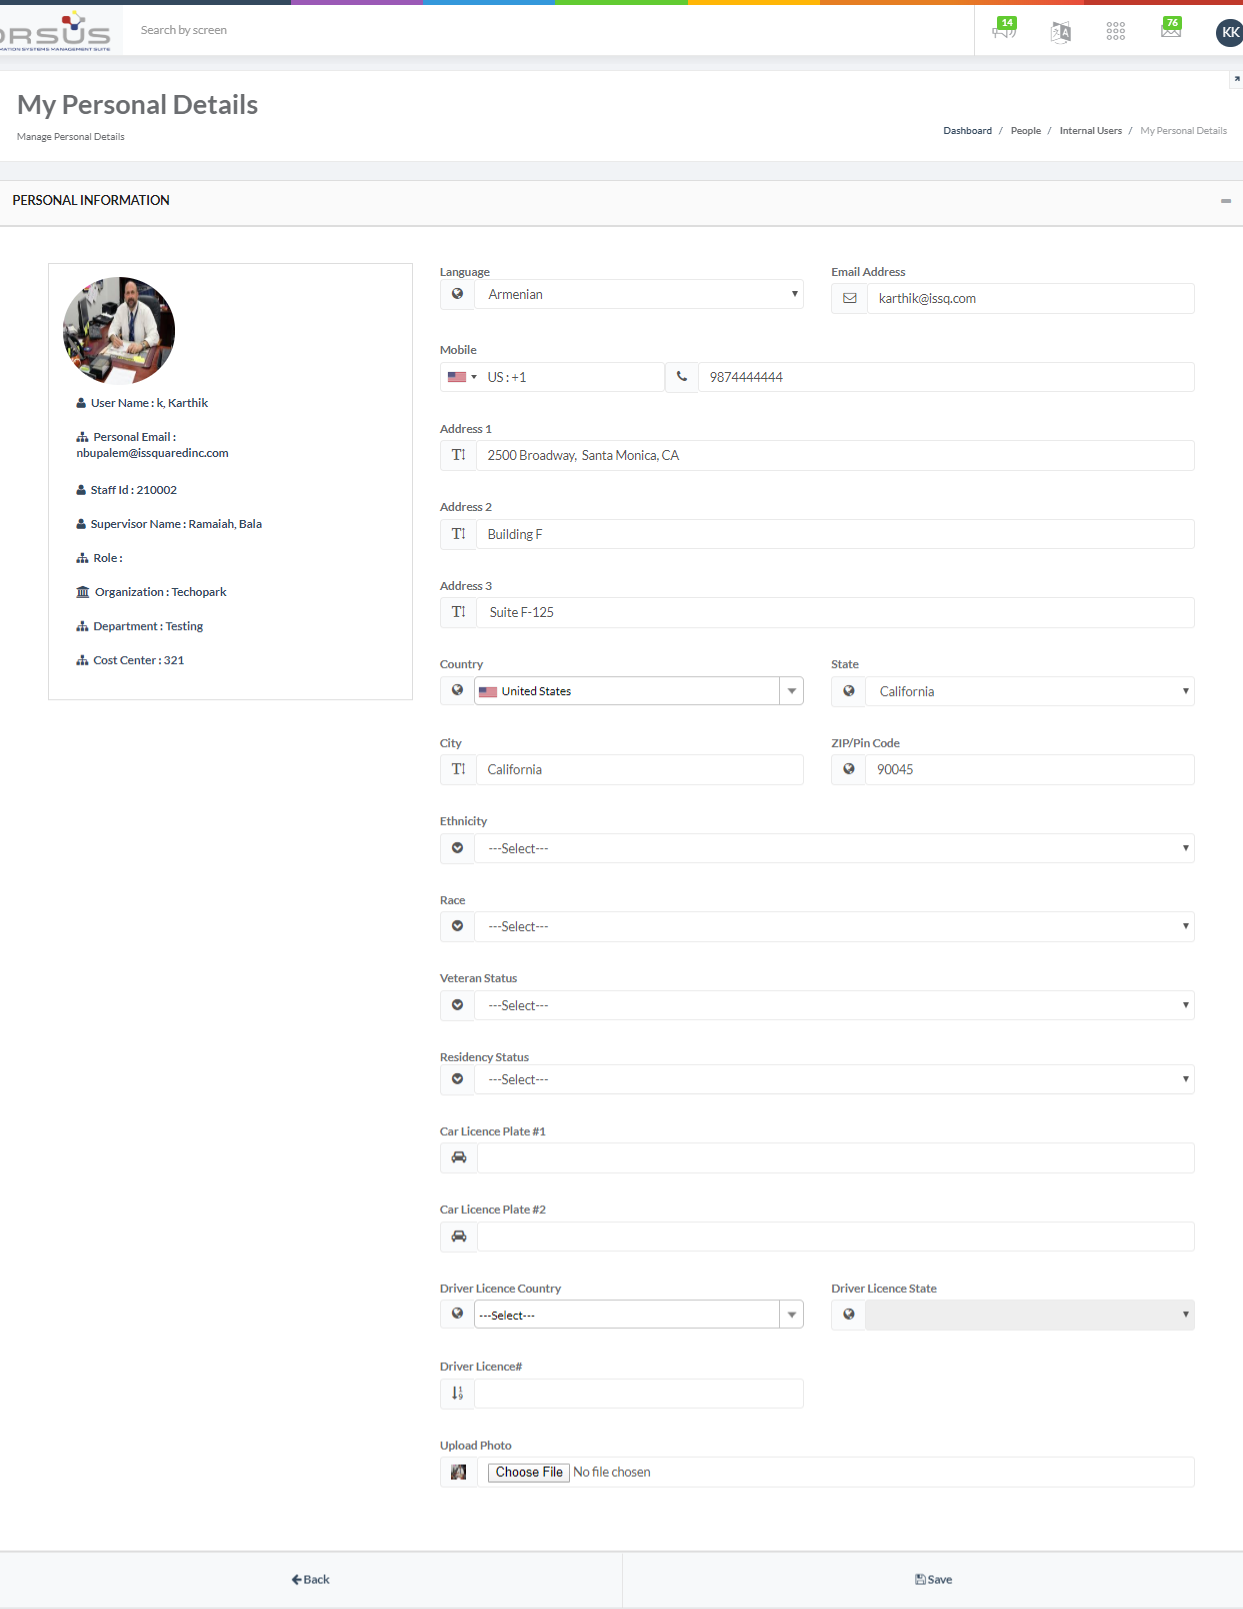
View & Edit Personal Details
Employees can view and edit his/her personal details, including email, phone number, address, photo, etc. They can access My Personal details tab under People in the Workforce module to edit the fields mentioned above.
To edit personal details: a) On the Workforce menu, click the People tab and then click My Personal Details on the sub-menu. The My Personal Details page displays. b) Enter fields given in this page and click Save. |
 |