
Manage Your Expense Claims
An expense is an amount spent or cost incurred by employees on behalf of the business. Employees can submit their expense reports to their supervisors in order to get reimbursement for expenditures. They can also add new trip (beforehand) and associated expenses and submit them to supervisors for approval.
Expense Claim Process
- In the workforce module, employees can submit their expense entries to their assigned supervisors in terms of food, mileage, travel, hotel accommodation, airfare, entertainment and other expenses. The application also facilitates to draft the entries for further modifications before submitting them to the supervisor.
- Upon submitting, reporting manager/supervisor receives the report and may approve or reject expense entry.
- If the expense report is approved by the supervisor, the employee receives the approved status and the expense amount will be reimbursed.
- If the expense report is rejected, the employee receives the respective status and the expense record goes back to the employee.
- The reporting supervisor can edit and view the details of the request before responding to it.
- After submitting, employees can keep track of the status of expense entries such as approved and rejected. Employees can add, view, modify and delete an expense report, however, they cannot modify an expense report, after it is submitted and approved.
- For Rejected expenses, employees can modify or update the expense entries and submit them again.
- The application allows the assigned supervisor to view the expense summary and do approve/reject tasks in the MY APPROVALS tab in the Global Module.
Add Expense Claims
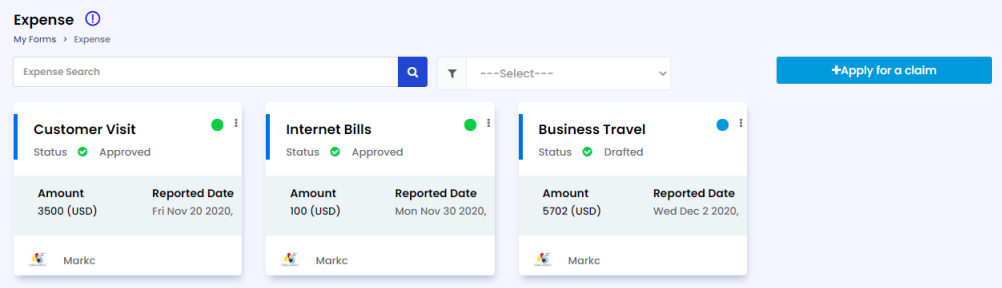
- On the Workforce menu, click the My Forms tab and then click Expenses on the sub-menu. The Expense page displays.
- Click the Apply for a claim button. The Basic Information section appears.
- Provide the following information and click Save as Draft button.
| Field | Description |
|---|---|
| Expense Report Title | Enter the name of the expense report. |
| Reported By | You need not to enter this field, the application automatically takes your name (login name of the user). |
| Reported Date | Enter or select the reporting date of the expense. |
| Expense Start Date | Enter or select the expense start date. |
| Expense End Date | Enter or select the expense end date. |
| Currency | Select the currency that you would like to use for your expense claim from the drop-down list. |
| My Cost Center & Cost Center Name | You need not to enter this field, the application automatically takes cost center data from your profile |
| Other Cost Center & Other Cost Center Name | Select the Other Cost center checkbox if you would like to relate your claim amount to a different cost center and accordingly select the cost center name in the Other Cost Center field. |
| Project & Project Name | Select the Project checkbox if you would like to relate your claim amount to a project and accordingly select the project name in the Project field. |
| Expense Reference | You need not to enter this field, the application automatically takes the expense reference when you save the expense record. |
| Expense Status | You need not to enter this field, the application automatically updates the status of your expense. |
After clicking Save as Draft, a Success Message displays indicating that Your Information Saved Successfully. Click Ok to acknowledge the message.
After Saving the expense record, the Bills tab will be enabled beside the BASIC INFORMATION section. You can add bills related to Food, Mileage, travel and any other expenses.
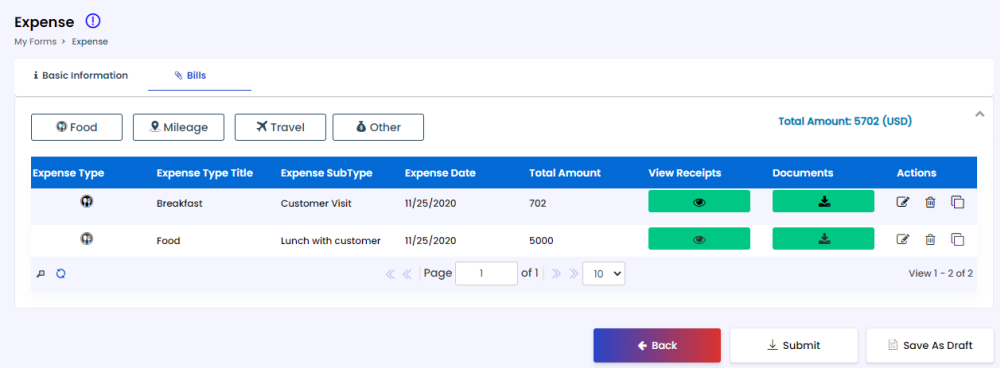
Add Bills:
4. Click the Food button on the Bills tab to enter food expenses, including Breakfast, Lunch and Dinner. Complete the following fields in the Expense Billing Information – Food popup and then click Save.
- Expense Type Title: Enter the name of the food expense entry.
- Expense Sub Type: Select the meal type from the drop-down list.
- Expense Date: Select the date on which you’ve paid for the food expense.
- Amount Spent: Enter the amount spent on the food.
- Total Amount: You no need to enter this field. The application automatically calculates the amount based on the amount spent, tax, tips and any other amount.
- Click More Options and then click Tax to enter the tax amount of the expense.
- Click More Options and then click Tips to enter the tip amount of the expense.
- Click More Options and then click Others to enter any other amount of the expense.
- In the Receipts tab, click the Choose File button to upload the receipt of the food expense. You can add one or more receipts based on the need.
5. Click the Mileage button on the Bills tab to enter travel mileage expenses. Complete the following fields in the Expense Billing Information – Mileage popup and then click Save.
- Expense Type Title: Enter the name of the mileage expense entry.
- Expense Date: Select the date on which the mileage expense was incurred.
- Travel Mileage Rate: Enter the mileage rate of the vehicle used during travel.
- From (Source): Enter the origin of the travel.
- To (Destination): Enter the destination of the travel.
- Distance: Enter the distance traveled and correspondingly selects the units such as (kilometers).
- Amount Spent: You need not to enter this field. The application automatically calculates the amount spent based on mileage rate and distance travelled.
- Total Amount: You no need to enter this field. The application automatically calculates the amount based on the amount spent, tax, tips and any other amount.
- Click More Options and then click Tax to enter the tax amount of the expense.
- Click More Options and then click Tips to enter the tip amount of the expense.
- Click More Options and then click Others to enter any other amount of the expense.
- In the Receipts tab, click the Choose File button to upload the receipt of the mileage expense. You can add one or more receipts based on the need.
6. Click the Travel button on the Bills tab to enter travel expenses. Complete the following fields in the Expense Billing Information – Travel popup and then click Save.
- Expense Type Title: Enter the name of the travel expense entry.
- Expense Sub Type: Select the type of travel expense from the drop-down list such as Airfare, Hotel, etc.
- Expense Date: Select the date on which the travel expense was incurred.
- If Airfare is selected in the Expense sub type field, enter the following fields.
- Source: Enter the origin of the travel.
- Destination: Enter the destination of the travel.
- Airline and Class: Enter the Airline name and select the class from the dropdown list.
- Amount Spent: Enter the amount spent for the Airfare
- If Entertainment is selected in the Expense sub type field, enter the following fields.
- Amount Spent: Enter the amount spent for the entertainment expense.
- If Hotel is selected in the Expense sub type field, enter the following fields.
- Location: Enter the location of the hotel where you’ve got lodging.
- Hotel Name: Enter the name of the hotel.
- Amount Spent: Enter the amount spent for the hotel expense.
- Total Amount: You no need to enter this field. The application automatically calculates the amount based on the amount spent, tax, tips and any other amount.
- Click More Options and then click Tax to enter the tax amount of the expense.
- Click More Options and then click Others to enter any other amount of the expense.
- In the Receipts tab, click the Choose File button to upload the receipt of the travel expense. You can add one or more receipts based on the need.
7. Click the Other button on the Bills tab to enter other expense entries. Complete the following fields in the Expense Billing Information – Other Expense popup and then click Save.
- Expense Type Title: Enter the name of the Other expense entry.
- Expense Date: Select the date on which the expense was incurred.
- Amount Spent: Enter the total amount spent for the expense
- Total Amount: You no need to enter this field. The application automatically calculates the amount based on the amount spent, tax, tips and any other amount.
- Click More Options and then click Tax to enter the tax amount of the expense.
- Click More Options and then click Tips to enter the tip amount of the expense.
- Click More Options and then click Others to enter any other amount of the expense.
- In the Receipts tab, click the Choose File button to upload the receipt of the expense. You can add one or more receipts based on the need.
For each bill, you have the option to update details, view receipts, download documents/receipts, clone the information for creating a new expense bill based on previous bill details and delete bills if needed.
After saving all the details associated with the expense report, including Bills, you can submit the expense to your supervisor to get approval. Click the Submit button to send the expense for approval.
Track Workflow Status of Expense Request
- On the Workforce menu, click My Forms and then click Expense on the sub-menu. The Expense page displays.
- Click the circle button on the top-right corner of the expense record for which you would like to track the workflow status.
- Click the User Approval Log button on the Workflow Status- Expense page to view more details of the workflow.
Final Approval / Payment process
- Once Supervisor/ Manager approves employees’ expenses, the next request will route to Accounts Department for final verification and payment process.
- Notification will be sent to Accounts Team. Then they will verify the details and approves the same for the payment process.